Variables are added to the viewer's variable category by left clicking on the light brown icon with the down arrow on the viewer's top menu bar. The types available on the pop up list are dependent on the class of object or what main preferences have been set but there is a basic set always available. Etoys does do explicit type checking. You can replace
tiles inside scripts with variable name tiles. A green highlight appears around the receiving tile if the types match.
Some Variable Types
Variable names are alphanumeric only. I've gotten in the habit of using lowercase and capitalizing the first letter of any additional words when naming variables, scripts, objects etc. Etoys will append a number to any reserved words used in a name. Variables can be removed or modified using the options menu on the left. Be sure to remove them from any scripts before doing so. Variables can be assigned values in the viewer, in a watcher or in an assignment statement inside a script and they may be passed as parameters to other scripts.
Numbers can have up to 10 decimal points. The value display will round up if assigned to a number with more decimal points than currently set. This is something to be mindful of when doing comparisons. The round function from the script editor menu will round numbers to the closest integer. Large numbers are displayed in scientific notation. Inside scripts, number variable types can be increased, decreased or multiplied by a value or assigned a value, the result of an expression or another variable. Tiles inside expressions can be replaced with number type tiles.
The Point type is a bit specialized. Points describe an x and y location and are assigned in the form 0@0. They can be increased, decreased and multiplied by another point value but cannot be used in expressions and can only be compared for equality.
The String type can be assigned alphanumeric characters from the keyboard or character strings inside other objects. Strings are immutable meaning that strings cannot be altered through expressions and are replaced completely when reassigned. They can only be compared for equality. However some objects have methods for manipulating strings. See Objects that Contain Collections for more information.
The Player type can be assigned objects in your project. Etoys documentation often refers to objects, morphs and players. All are object classes and there are distinctions between them but for the user, player is the most relevant term to scripting. When you create a player type variable you'll see a black dot inside the value display. A little black dot does exist hidden up in the top left hand corner of the main menu bar. This dot is the default value for player variables. Any tile containing the word dot can be replaced with an object reference tile. Inside the viewer you can assign a value by clicking on the image in the value tile and selecting an object on screen with the cross hair. Or drag the variable tile out by the assignment symbol and drop. The value tile now says dot. Right click on the desired object and click the orange rectangle halo icon to get a reference tile and replace dot with it. That object's properties, methods, scripts and variables can now be accessed using the variable. This is a very powerful feature better demonstrated than explained. See Dynamically Creating Sibling Objects for an example.
Color variables display the current color of the object and must be assigned with the color picker. They can only be compared for equality. To manipulate object colors use numeric properties in the color category instead.
The graphics type is useful for Sketch objects and can be used to change costumes for animation. Assign inside scripts by clicking on the image value and selecting an object on the screen or assign a pen trail graphic from the world or a Playfield object to a Sketch's graphic property.
Other variable types are assigned through drop down lists and can only be compared for equality. Boolean types are either true or false. ScriptName variables can be used to replace values in tiles from the scripting category.
Any variable type can be passed to another script as a parameter but scripts can accept only one parameter. It's name in the script is it's type so make sure you select the correct type in the script editor menu. Clicking the parameter name in the script editor menu gives you tiles that you can use in your statement tiles. This is the one serious limitation in the tile scripting system. If you are really determined to have multiple parameters you can pass a holder containing the values you want and fetch them out of it but this won't usually work well if you're using recursion to send a parameter in an expression.
Remember when I was going on about how all the objects in your project are instances of objects inside an instance of a world object? That means that all objects are local to the world object. Variables can be modified by scripts belonging to any object including the world object. That doesn't mean however you shouldn't think about scope. Even though you can define variables anywhere you like, scripts and variables you intend to share with sibling objects must be defined inside siblings. I try to define variables all objects might use inside the world object (global scope) and define others in relevant objects (local scope). If you intend to define a constant value, it might be good to remind yourself by prefacing the name with const such as constVariableName. It does make it a little more difficult to explain the concept of scope to a novice because it takes discipline to practice. Discipline I often lack.
There are three main types of collections (poor choice of word here not to be confused with variable types) and there are multiple objects that contain them.
Text
Several objects can be used to enter and display text but not all have a text category. The Text, Enhanced Text and Title objects do. Open a viewer on a Text object and you'll see text in the category list. This provides tiles for manipulating strings. Each character is an element in the collection. The numeric value is a conversion of any consecutive numeric characters into a number and is of a number type not string. In other words you cannot assign string variable value 123 to the Text object's numeric value. Any assignments must match type. Text object "cursor" and Text object "count" are also number types. The cursor can be moved to individual characters and Text "count" can be used in loop creation. All other properties are of type string and string variables can be inserted or appended. To remove characters you can assign a replacement string to an appropriate property. Formatting text has to be done manually through the object's halo options.
Playfield
The World, Playfield, Holder, Graph Paper, and X-Y Plane objects can contain any kind of object but they have individual options set that make them useful for different purposes such as the Holder for creating arrays. They have their own co-ordinate systems outside of the world object's and are very useful for assembling other objects. Playfields have a collections category and a playfield category. A cursor can be moved through elements like any other collection. Other than the "count", "cursor", "numeric value at cursor" and "string contents", values are of the player type. If you click on the menu icon to the left of the object's "player at cursor" property you'll see an option called tiles to get. This brings up a list of properties from the individual object at the cursor. Not everything from the list is available for every object but you can usually get number, string, color or player tiles from it. This means that you can directly manipulate objects inside collections from playfield type objects. You can also get an assignment tile out of the viewer of the object at the cursor and replace the identifier tile with the "player at cursor tile". This is great for looping through collections and setting or getting values for variables and properties in each object.
Books are special cases that contain pages. Pages themselves are a type of playfield that can contain any object. Books are rather like small presentation applications and have a number of features. I won't go into too much detail here because they are too much fun to explore on their own.
Polygon
Polygons are collections of vertices. Like points vertices have an x and y location but unlike the point type their location cannot be expressed as a point 0@0. Polygon, Curve, Triangle, Line, Arrow and Curvy Arrow all have polygon categories. Don't confuse Line, Arrow and Curvy Arrow with objects in the Connectors category from the catalogue. Connectors are intended for diagramming and have unique features. Hold the shift key down and left click on Polygon objects to see handles. Move an individual vertex around with the mouse or add vertices by clicking on the small green triangles and remove them by dragging a vertex over the next closest one. Vertices can only be added to Triangle and Arrow objects with scripting tiles and the Triangle object displays handles by default.
When handles are showing you'll notice that one vertex is blue. Open the viewer, select the polygon category and you'll see the cursor is located at the blue one. Move the cursor and the next vertex becomes blue. You can also see the X and Y value for each vertex. Fun thing to do. Run "shuffle" vertices with a closed polygon. The rest of the tiles are concerned with adding and removing vertices or setting options. I am certain you can do some pretty crazy math related things with these objects but I have done very little experimenting with them so far.
Notes on all Types of Collections
The cursor always wraps around to the first element if it gets moved past the last element so consider this when designing loops. Make sure decimal point settings match up in object values, variable values and numeric collection values or difficult to detect errors can occur. Forgetting to replace tiles everywhere needed can also cause puzzling errors.
An object's icon halo gives you the option to duplicate the object or make a sibling copy. Although duplicates are an exact copy of the original at the time, they are separate object instances. Changing the original has no further effect. Sibling copies on the other hand share variables and scripts. Add a variable or script in one and they all update. Siblings can have individual values set for properties and user created variables but they all have identical versions of scripts including script status and tick rate. Scripts can be called on to run in specific siblings or all of them. Both duplicates and siblings share the same name as the original with numbers appended in order of creation and can be renamed if you like. Copies created through scripting are always siblings which means you wind up working with siblings a lot. This is a powerful feature of the scripting system and it pays to understand how they work.
For this example I'm going to create copies of a Star object. Scripts and variables are created using the viewer for the original Star object.
Steps
Create Original Object:
Drag out a Star object from the Supplies Flap and right click on it. By default it's rather small so resize it holding down the shift key to preserve it's aspect ratio. Open it's viewer with the blue eye icon.
Create Reset Scripts:
Whenever I work with sibling copies, I like to set up a couple of scripts to remove them and start over if I need too. Believe me this saves a lot of grief.
Drag out an "empty script" tile from the scripts category and name it reset.
Get another "empty script" and call it delete.
Go to the miscellaneous category, drag out the "Star erase" tile and drop it in the delete script.
Now select the scripting category. Drag the "Star tell all siblings" tile to the reset script and select delete in the drop down box. Whenever the reset script is run all the siblings will run their delete script and remove themselves leaving the original. They will not go to the trash but will be gone forever. Objects only go to the trash when manually deleted with the halo icon so beware any tile or menu option that says erase or destroy. Be careful not to confuse the "tell all siblings" tile with the "send to all" tile because "send to all" will remove the original as well. After checking my scripts have the correct tiles, I usually send delete back to the viewer so I don't accidentally run it.
Create copy spawn scripts:
Inside Star's viewer we need to create a new player type variable. Click the light brown down arrow icon on the very top bar of the viewer. I am going to call it newStar. Remember to select type player. If you forget you can change it by clicking on the menu icon to the left of the variable in the variables category. This variable will hold a reference to the last copy created. The default value is the Dot object. Next drag the "newStar" variable out by the assignment symbol from the variables categorry and name the resulting new script. I'll call it spawn.
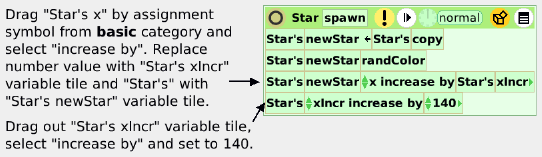
Now select the miscellaneous category and drag out the "Star's copy" tile and replace the variable value tile with it. The tile should read "Star's newStar <- Star's copy".
That's all there is to making sibling copies. Every time we run the spawn script a new star is created. Because they are copies of Star, they are all the same color and pile up on top of each other. They'll be easier to distinguish if we make them different colors and spread them out in a row.
Set the copy's unique values:
Get an "empty script" tile and call it randColor.
Go to the color category in Star's viewer, drag out the "red", "green" and "blue" tiles by the assignment icon and drop them on the randColor script.
Open the gold box on the script editor menu and you will see a tile for creating random numbers in a range from 1 to value. The default is 5. Replace the value tiles in all the statement tiles with the "random number" tile and set each one to 100. This will set the rgb values to a random number between 1 and 100 and combine to form a new random color.
Go to the script category and drag the "randColor" script tile to the spawn script. We want this script to run in the new Star not the original. When the spawn script runs player variable newStar is assigned the copy. So drag the variable name tile "Star's newStar" to the script and replace the tile "Star's" with it. Now the statement should read "Star's newStar randColor". The script will run in whatever player object is assigned to the newStar variable.
Now we want to move the copy to the right along the x-axis. 140 pixels should be enough. Each copy we make will be set to Star's values so we will need to increment the x location by 140 every time we make a copy or the stars will start to pile up on each other again. Make a new number variable in the Star viewer called xIncr and set it to 140.
We are going to want to reset that every time we start over so drag it by the assignment symbol over to the reset script.
Next go the basic category and drag out "Star's x" tile by the assignment symbol and drop it on the spawn script. Click on the "x" or the arrows to the left of it and select increase by. Replace the current "x" value with the "xIncr" variable tile. Replace "Star's" with the "newStar" variable tile so only the copy's x value increases by the value in xIncr. The statement should now read "Star's newStar x increase by xIncr". Now grab the "xIncr" statement by the assignment symbol, drop it in the spawn script and set it to increase by 140. It should now read "Star's xIncr increase by 140". Now each time the spawn script is run, a new star should appear 140 pixels to the right of the last one and should have a different color.
Run the script once and open Star's viewer. An image of the copy should be visible in the newStar variables value. xIncr should now be set to 280. Right click on the new star. It should be named Star1. Open it's viewer and you'll notice that the newStar variable and the xIncr variable are set to whatever Star's values were when it was copied. Drag out the "randColor" script and look at the statements. They all now automatically belong to Star1. So when the spawn script ran Star1 was first created and then assigned to variable newStar. The statements in the rest of the script are translated to "Star1 randColor" etc. Create another star and you should see the new copy in Star's newStar variable. Open the viewer for the new Star and look at it's values. When you run out of room for more stars you can run reset and start over and perhaps figure out how to start a new row in the spawn script. On a side note, you'll notice a star category added to Star's viewer. Playing with the options there changes the Star object in interesting ways.
There is one tricky thing to know about assigning values to player type variables inside objects and making copies. If you create a player type variable in the original object and assign the player object itself to the variable, the copy will automatically assign itself to the same variable. If you need the value for the variable to stay constant, that is not the behaviour you want. In that case, define and assign the variable outside of the object in the World object. That way you only need to assign it once. I'll go through that in the next post Creating a Linked List with Sibling Objects which is one example of what can be achieved with sibling objects.
Linked lists are just one of the many things siblings are useful for. In it's most basic form a linked list is a collection of items that each contain a reference to the next item. Linked lists are used in many familiar data constructions.
Collections allow for dynamically adding, inserting and removing objects but linked lists are an efficient way of tracking similar objects that are spawned randomly across the screen. To illustrate this we'll modify the Star copying project from Dynamically Creating Sibling Objects. To do this save the Star copying project under a different name. Now use the reset script to clear the sibling Star copies and start over.
Steps
This time we'll get the world object to track the first and last star created. Right click on the world Object and click on the blue eye icon. We need to create two new player type variables. Variables are created by clicking the light brown down arrow on the top bar of the viewer. Name the variables firstStar and lastStar. If you forget to set them to player type or name them, modify them using the menu icons on the left side of the variables category.
We only have one star available so click on the value boxes in the viewer and select the Star object with the cross hair for both variables. The firstStar variable must be created in an object other than Star to prevent the copies from updating it with their own value. We want the firstStar variable to remain constant.
Star reset script
Now drag the "world's firstStar" and the "world's lastStar variables' to the reset script by the assignment icon just to ensure these variables are properly set whenever we delete copies and start over.
We need one more player type variable in the Star object to store a reference to the next star. References in linked lists are usually called nodes so we can call it nextNode. Now somewhere in our scripts we need to assign an object to it that hasn't been created yet.
This where the world variable lastStar comes in. Get out a new script from the World object viewer and call it makeStars.
Drag out the Star's spawn script tile from Star's viewer and drop it in the new script.
world makeStars script
Now replace Star's with the tile for the lastStar variable. This means whenever makeStars is run the spawn script belonging to the player assigned to lastStar will run.
Star spawn script
We now have to make some changes in the Star's spawn script. If each copy is spawning the next copy we no longer need the increment variable to set the x axis location. Remove the tile that increases the xIncr variable.
Get a number tile out of the gold box, replace the xIncr variable tile with it and set it to 140.
Star spawn script
Now open the World viewer and drag the lastStar variable tile out by the assignment symbol. Replace the value with the newStar variable tile from the Star viewer.
Drag out the nextNode variable and assign variable newStar to it too.
Everytime makeStars runs, the spawn script runs in the object that the lastStar variable is assigned to. A copy is assigned to the newStar variable in that object, the copy gets a random color, gets moved 140 pixels right along the x-axis and then the copy is assigned to the lastStar and the nextNode variables in the object represented by lastStar. Make few stars and look at the values in the viewers for the World and the stars. firstStar's value should still be the original star because it was assigned once in the World object and not in any of the sibling stars. lastStar's value should be the last star in the row. Each Star object should show the next copy in the list as the value for nextNode unless it's the last star.
Count the Stars
If everything has worked out with our scripts we should now be able to work with our linked Star objects. Counting them is the simplest to illustrate.
Open the World viewer and create a number type variable called sCount (count is reserved for collections).
world startCount script
Drag out sCount by the assignment icon and set it to 1. Call the resulting script startCount.
We are going to use recursion for this. This means we'll use a script that calls itself somewhere in the script.
Get out another script, name it countStars, open the script editor menu options icon and select add a parameter. Use the up/down arrows to the left of the parameter to set it to type player.
world countStars
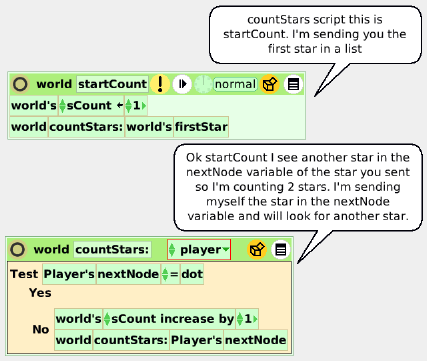
If we make sure that the nextNode variable in the last star is set to dot we can use dot to test if the script has reached the last star. Drop a test tile on the countStars script.In the test section, drop the nextNode variable tile from the Star's viewer. Click on the parameter and there should be a player tile stuck to the mouse cursor. Replace the star name tile with the player tile. The statement should read "Test player nextNode = dot".
Star reset script
Drag another "nextNode" variable tile by the assignment symbol to the reset script. Drag out the "world's lastStar" variable tile from the world viewer and replace "Star" with it. Go to the Supplies flap and drag out the Players Tool. The Players Tool displays all the player objects in the world. Click on the menu icon on the left of the dot object and select tile for this object. Drop the "dot" tile on the value on the right of the "lastStar nextNode" assignment statement. This way we can be sure that the last star's nextNode variable will be set to dot and the recursive loop will be able to meet it's stopping condition.
world countStars script
Now go back to the world countStars:dot script. Leave the yes branch blank because if that is true we can stop counting as there are no more Star objects.
Get the sCount variable from the World viewer by the assignment symbol and drop it into the No branch. Set it to increase by 1.
Now drag out the world "countStars:dot" script tile and drop it underneath the "sCount" assignment statement inside the No branch.
Get another nextNode variable from one of the stars and replace the parameter tile in the statement with it.
Click the parameter box on the script editor menu to get another player tile and replace the star's name with it. This statement should read "World countStars player nextNode".
world startCount script
Drag out the "world countStars:dot" script tile again but drop it in the startCount script this time. Replace the parameter tile with the firstStar variable tile from the World object. Make sure to save before running this script in case something goes wrong. Run startCount and check the sCount variable.
So what is going on here? This example demonstrates a process known as traversing a list using recursion. The startCount script initializes the counting variable and calls the countStars script passing it a reference to the first star in the list. The countStars script assigns this object to the player variable. The test tile checks the value for the nextNode variable inside that object. If it is equal to dot nothing more happens and the script stops because there are no more Star objects in the list. If the nextNode value is a Star object then the tiles in the No branch execute. The sCount variable value is increased by 1 and the countStars script is called again but is passed a reference to the object assigned to nextNode which should be the next star in the list. The script will repeat until the player nextNode variable equals dot.The sCount variable should equal the number of stars in the list.
Of course you could also count the stars at time of creation. By giving objects unique values, you can use these techniques to locate objects by testing for values and issue commands to them or change their properties. If you want to remove an object, you'll have to make sure to reassign the preceeding object's nextNode value. The countandremovestars.007.pr project file demonstrates how to remove the last Star object in the list. This file can be downloaded from my GitHub repository. Save it to your Etoys directory and load it into Etoys.
Although recursive processes, referencing objects and traversing lists are common programming tasks, they aren't the easiest to understand. Hani Awni's SnakeSpawn project at Etoys Illinois was my guide. This is an excellent example of how linked lists can be used in games.