If the following paragraph makes no sense to you, don't worry, it's not necessary to understand at all to use the program. It can be helpful to understand if you are using Etoys to teach or apply programming concepts.
Etoys is a prototype object system. Everything on screen is an instance of an object pre-defined in Squeak Smalltalk. So to be clear when I refer to objects I'm really talking about object instances. It is not possible to create news classes of objects using the Etoys scripting tile system, you can only edit and manipulate object instances. Etoys is a Squeak image and you can use it to program in Smalltalk if you like but the focus here is mostly on the visual scripting tile system.
The opening home project has links to tutorials and demos but we'll just plunge into starting a new project.
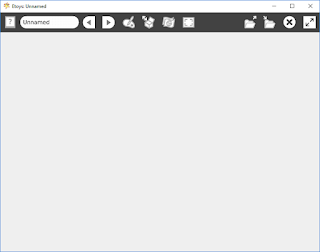
When you open a project window Etoys creates an instance of the world object. Everything you see on the screen including the menu bar is contained within the world object. There are no separate staging areas. Design, scripting and script execution all happen in the same workspace. Left to right the menu bar contains an icon to get help, a box to enter a project name, arrows to navigate back to the home screen or through multiple projects, an icon to start a painting app, one to open a supply flap, one to select the interface language, one to toggle fullscreen on and off, icons to load and save projects and one to toggle the menu bar on and off. Hover over the icons with the mouse to get pop up tips on usage.
There are three ways to add objects to projects. You can paint one in the painting app. You can drag and drop files from your local drives. Png, jpg and bmp graphic files work well and they become sketch objects like the paintings. Sketches have unique properties similiar to sprites in Scratch. Dragging objects out of the supplies flap and fiddling around with them is the most fun. The supplies flap holds some commonly used objects and the object catalogue which holds the full complement of available objects. These range from basic shapes to small applications.
We'll start with a simple Ellipse. Click on the supplies flap icon and click on the Ellipse then drag and drop the created copy onto the main screen. Click on it with the left mouse button and it sticks to the cursor while you move the mouse around. Click again and it drops. Most objects can be moved this way but there are exceptions which can only be moved with the move handle icon.
Right click on the Ellipse and it becomes surrounded by icons. At the bottom you can change the name from Ellipse to give it a unique identifier.
Icon usage from bottom left clockwise:
 Left click and drag to rotate object.
 Left click to get a reference tile for object.
 Left click to open a viewer on the object. The viewer opens on the right hand side of the screen and displays all the properties and command tiles belonging to this object.
 Left click to collapse the object to the top left hand corner of the screen. Object can be maximized again with the same icon on the right side of collapsed version.
 Left click to delete object. Objects deleted manually this way are sent to the trash can that appears in the bottom left corner and may be retrieved by double clicking on the trash can.
 Left click to open a menu of options for this object. Options available depend on object type and preference settings.
 Left click and drag to embed inside another object. Receiving object must have "accepts drops" set in its options menu. The embedded object's icon halo is still accessible by multiple right clicks.
 Left click and drag to move object.
 Left click to create a duplicate or hold down shift and left click to create a sibling copy.
  Left click to change colors with a color picker. The color picker works anywhere on the workspace as well as the color dialog. Hold shift to get more options. If the object is a sketch the paint tool opens for editing instead.
 Left click and drag to resize object. Hold shift and drag to preserve aspect ratio.
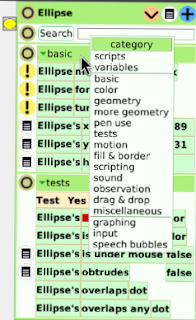
 By default the viewer opens with the basic and testing categories visible. To change categories just left click on the solid green category bar and a list of categories appears. The category list depends on the class of object and preference settings but most objects from the Supplies flap should have this basic list. The blue plus sign icon in the top right hand corner will add a category to the view and the circle icon on the left of the category bar will remove it from the view. Click on the small object image on the left of the viewer to open and close the viewer flap.
 The exclamation point icon indicates a command that will run right away. If you have Etoys running right now go ahead. Click the exclamation points. Make your Ellipse croak like frog. Some commands have editable parameters.
Properties that can be changed have a menu icon and an identifier tile on the left side and an assignment symbol attached to a value display on the right. Etoys uses the assignment operator ←. The equals sign = is used for comparison only. Depending on the property type you can change it by scrolling values, typing in a new value or selecting one from a list. Changes have an immediate effect.
 The identifier tile on the left hand side can be dragged out on the screen as a watcher. Changes can be made there or you can watch values being changed by scripts.
The test category contains special tiles that are used for detecting other objects or conditions. They are read only, are used inside testing tiles and will evaluate to true or false.
 To create a new script just drag out a command tile or drag out an assignment symbol from a property tile. Once dropped on the world a script editor will automatically spawn to enclose the tile and the scripts category appears in the viewer. You will see a tile representing your new script. Continue adding tiles to your new script or create an new empty script by dragging out an "empty script" tile. To remove a script from your project right click on the editor and left click the remove icon. Unlike other objects, script editors do not go to the trash but are deleted permanently. Script editors really are individual little code editors and can run simultaneously with other scripts while using individual settings. Objects can have multiple scripts and scripts can call other scripts by including their script tile.
Along the editor's menu bar you can see options to collapse it back to the viewer, give it a unique name, run it with the yellow exclamation icon or step through it one statement tile at a time. You can also change it's status to run constantly (ticking) or handle mouse and other events. The rate at which it runs can be changed by clicking on the clock icon. There are useful tiles available in the gold box icon. Among the list of options in the options menu, you can select to add a parameter, create a button that runs your script when clicked or convert tiles to text and write and save Smalltalk code.

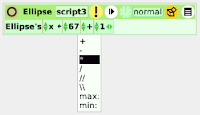
 When you look at the individual tiles in your script you'll see that they are comprised of smaller tiles and are often preceeded by up/down arrows or end with left/right arrows. The left tile is the identifier of the object the statement tile belongs to, the next one is the property or method name and the one on the right of an assignment symbol or a semi-colon is the value or parameter. The left/right arrows mean an expression can be built with this tile. Just click the right arrow to add a value and click the left arrow to remove it. Operators are selected with the up/down arrows. Individual tiles inside the statement tiles can be replaced with variable or property tiles as long as the data type matches (character string for a character string, number for a number etc.). A small green highlight surrounds the tile being replaced when the types match.
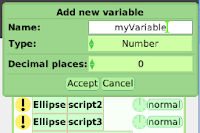
Variables are created in the viewer by left clicking the light brown down arrow icon at the top of the Viewer window. Give the variable a name, select the type and any other options available. The variable tile now appears in the variables category. It is assigned a default value at time of creation. Change the value if you like. Drag it by the assignment symbol to drop it into a script or drag the variable name to create a watcher or replace another tile. For more on variables see Variable Types and Thoughts about Scope.

So that's the basics of working in the Etoys system. The user has a lot of control over managing the visible workspace. Objects behave in similiar ways. Many such as viewers, scripting tiles and editors are constructed with multiple objects. There are objects to manage other objects. Delete a scripted object instance and all it's associated values and scripts go with it. Of course such control causes a few headaches. Such headaches motivated this blog. Hopefully the Tips and Troubleshooting section can help. There's some particular caveats about deleting things in Save and Save Often.
Last Updated January 29, 2017.


