This brings me to one of the key things to understand about scripting. Scripts run on a unit called a tick. I'm not sure how exactly that's defined but it doesn't matter, more importantly when a script is run each and every statement tile is processed and executed in one tick. A tick cannot be interrupted or paused. Test branches and repeat loops are followed but are processed in one tick like any other statement. Any statement tile following a "test" or "repeat" tile is processed. No matter how many statements are stuffed in, it all happens in one tick.
 This makes "repeat" tiles fine if you just need a result and can calculate the repeat value ahead of time but if you want a conditional loop or need to watch a gradually changing condition they won't do. The Etoys manual explicitly explains these things in the scripting category section but of course I didn't read the manual right away and because the "repeat" tile was the only other obvious control tile I could see, I persisted in trying to make it do what I wanted.
It turns out that Script Editors themselves are quite versatile. When set to ticking status they run continuously and multiple scripts can tick at the same time. The tick rate control sets how many times per second the script will run. It has nothing to do with how long a tick is. This makes ticking scripts useful as timers, script event listeners and handlers or animation controllers. Here's a link for a discussion on timers. Or you can dowload project simpleTimer.004.pr from my GitHub repository. Save it to your Etoys directory and load it in Etoys.
There are two methods for creating conditional loops and you guessed it one involves ticking scripts. The scripting category contains tiles to start, stop and pause ticking scripts. It is important to understand that these tiles are like any other and are executed along with any other statement tile in the script so they cannot be used to interrupt the current tick. However, they will affect the target script in the next tick.
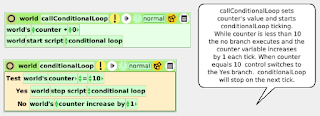
You will need to set up a stopping condition and put the "pause" or "stop" script tile in a branch inside a "test" tile. Creating a variable for a counter is the simplest way to do this. Initialize the variable to a starting value in the script that calls the ticking loop script. Add a "start script" tile to tell the loop script to start ticking. Add a "test" tile to the loop script and set it to test for a value. For example, to run the loop 10 times, start the counter variable at 0 in the calling script, set test to variable = 10, put the "stop script" tile in the Yes branch and put a variable "increase by" 1 tile in the No branch. Set the "stop script" tile to act on the loop script containing it. The tick rate defaults at 8 ticks per second but you can set it slower or faster if you like. Remember that even if the test condition is met (variable = 10) any other statement tile in the Yes branch or any statement tiles following the "test" tile will still be acted on once. On the next tick, the loop script will get the message to stop, reset the Script Editor's status to normal and do nothing further until called again. If you need a new script to run put a "script", "do script"or "start script" tile in the Yes branch.
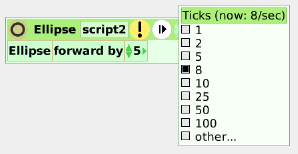
Creating loops this way can be a little slow. The tick rate is set through the clock icon on the Script Editor menu. Although you can set a custom tick rate, the maximum seems to be 100 per second. If you are rotating an object 360 degrees at 1 degree per tick it will look slow even at maximum so you may have to optimize your animation logic to get the results you want. Rotating 10 degrees per tick instead of 1 will only loop 36 times and speed up the animation. You'll need to find a balance between speed and smoothness. If you want to control ticking scripts using the AllScripts tool, scripts should be set to paused status not stopped (normal).
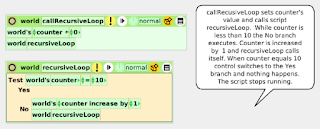
For fast conditional loops, we need to turn to recursion. A recursive script contains a tile that calls itself so a stopping condition is necessary or the script will call itself indefinitely. Unlike a ticking script, recursive scripts continue to act in one tick and if they don't stop your Etoys image may lock up eventually. See How Do I Stop This Endless Loop or Other Rampaging Scripts? You can set up your recursive loop in a similar way as the ticking loop with a counting variable initialized in the calling script and a tile to call the loop script. Set up the "test" tile in the looping script the same way but in the No branch add a "script" tile for the looping script itself. Make sure this is added after the variable "increase by" tile or you will never reach the stopping condition. Either leave the Yes branch blank or add a tile to call or start a new script. Always save your project and double check to make sure that your statement tiles are in the correct order and the stopping condition you have set can be met before running recursive scripts.
Recursion is the only way to create a conditional loop with a script using a parameter. Check Creating a Linked List with Sibling Objects for an example of using a parameter and a recursive loop. Etoys scripts can only have one parameter set at a time. If you have a need for multiple parameters, you can pass a holder of objects and fetch values from them but this usually won't work well with recursion if you need to pass the parameter value in an expression. Lenny Pitt has shared two projects that demonstrate passing a parameter expression recursively at Etoys Illinois.
There are other methods of creating timers and event handlers. Playfield objects such as the World object have a "timer" tile inside the viewer Playfield category. This can be set to 0 but you will still need a ticking script to continually test the timer's value.
Etoys objects can respond to user created events. This feature may or may not be set in preferences but can be set if it's not available in your image. This is mostly useful to create events that affect a number of objects. An event can be created in any Script Editor. Left click on the status box in the Script Editor menu bar, select more and you will see an option to create a new event. You will be prompted to give your event a name and a description. All objects you would like to respond to this event require a script that sets up the object's actions in response to the event and the Script Editor Status must be set to the name of the event. A script containing the tile "trigger custom event" can be created inside any object. When this script is run, any script set to the custom event status will run from each containing object.
So in Etoys we learn to manage program flow with "script" and "scripting" tiles from the scripts and scripting category and manage state through Script Editor status. It takes some care to think through a solution. To sum up it all up, by default scripts have normal status and will run once when called by a script with a "script" tile from the scripts category. Tiles from the scripting category are used to start, pause and stop ticking status. When a script encounters a "pause script" or "stop script" tile it will continue processing statements until the end of the script and the script's status will be set to paused or normal on the following tick. Multiple scripts can have ticking status and run simultaneously. Scripts can also be set to respond to events.
Last Updated .


